Virtual Field Trip: Chickens

Here is the video of our Facebook Live field trip that took place yesterday. We hung out in the coop and talked about chickens.

As always, if you have any questions that I didn’t answer in the video please leave them in the comments and I will post answers.

I won’t be doing a field trip next week because we will be on baby watch! Our first lambs of the season are due around April 29th. We will check in with the ewes during the week with videos and possibly Facebook live events, but they won’t be planned like the field trips are.

Virtual Field Trip: Eggs

For our friends who aren’t on Facebook, here is our latest Virtual Field Trip. This time we talked all about eggs.

Please post any questions below in the comments.

Time Lapse of Chick Hatching

This chick hatched on March 20th, and was one of 16 that we hatched in our incubator. All the eggs we incubated were produced by our flock and the chicks are mixed breeds or “Barnyard Beauties” (except for 1 Silkie chick that isn’t a mix). This time lapse video was taken over a 24 minute span.

Any questions? Please post in the comments!

Virtual Field Trip

With schools closed because of the Covid-19 virus, we decided to host a Virtual Field Trip to complement any learning your children are already doing from home. We broadcast the field trip live on Facebook Friday, March 20th, but also wanted to post it here for anyone not on Facebook.

We hope you enjoy this, and please post any questions you have in the comments below.

We will be hosting another virtual field trip on Wednesday, March 25th live on Facebook at 1pm EDT. The topic of this broadcast will be Eggs.
Continue reading

Some Egg Oddities

I wanted to put together a post of odd eggs that we have gotten over the years.  To understand why mishaps occur in the egg laying process, though, you should first know how normal eggs are laid.

hen reproductive tract

If you have a rooster in your flock, chances are most or all of your hens will lay fertilized eggs (eggs that will produce chicks if properly incubated).  Each egg takes 24-36 hours to form.  After the yolk is released from the ovary it travels through the oviduct.  It is fertilized in the Infundibulum, the albumen (or the egg white) is added in the Magnum, the shell membrane is added in the Isthmus, the shell is added in the Uterus or Shell Gland, and the bloom is added in the Vagina.  Most of this is self-explanatory, but many people have never heard of the egg’s bloom.  This is a clear coating the egg is covered with to seal the pores so bacteria cannot enter the shell.  Air, however, can still go through the pores.  (This is why you can wipe off eggs to be incubated but you should never wash them.)

No Shell

Here’s an egg with only the inner membrane and no shell (also called a rubber egg).  Hens can lay eggs like these at the beginning or end of their laying cycle or if they get scared (usually at night as a result of predators or stormy weather).  You may see these eggs occasionally in your flock.  If your hen lays eggs like this regularly, it may indicate a lack of calcium, phosphorus or salt in the hen’s diet; or an abnormality in the shell gland.

WP_001827

These eggs are normal in every other aspect and can be eated, but are usually torn open by the chicken (or the farmer).  If left out too long they will start to dry out.

No Yolk 

Sometimes a hen will lay a tiny egg (here are 3 that I’ve emptied and saved).

20171223_194937-01

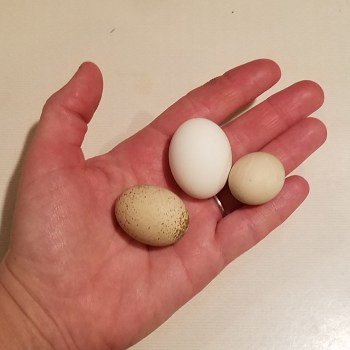
These eggs usually have no yolks are often called wind (or fart) eggs, dwarf eggs or rooster eggs.  Many times an egg without a yolk is one of the hen’s first eggs, laid before her system is working properly.  These eggs also occur when a piece of tissue breaks away from the hen’s reproductive tract and is treated like a yolk as it travels through the oviduct.  When this is the case, a small piece of greyish tissue can usually be seen in the albumen.

WP_001878

Egg with a “Tail”

This egg was such a surprise.  The shell was hard like a normal shell everywhere, except “tail” and where the “tail” met the egg.  That part of the shell wasn’t hard but it wasn’t quite as soft as the membrane of the shell-less egg above, though.  It is thought to be caused by the egg not being hardened enough before being laid.  The soft part of the shell is then elongated as the egg is being passed.

WP_001873

Double Yolk Eggs

Double-yolk eggs occur when 2 yolks are released at the same time, or when they are released close enough together that they become encased in the same membrane and shell.  These eggs can occur at the beginning of a hen’s laying cycle, but some hens are genetically predisposed to lay double yolk eggs on a regular basis.  (It’s similar to fraternal twins running in families.)  In hens that lay these eggs only occasionally, the egg laying cycle is usually interrupted.   Hens generally lay an egg every 24-36 hours but if they skip a day, the next egg that they lay can be a double-yolk egg.  These eggs rarely hatch 2 chicks if incubated.  Multiple factors are at play: each yolk may not be fertilised and if they both are, both chicks may not survive pipping without careful assistance.  Below is a double-yolk duck egg:

double yolk duck egg

double yolk duck egg 2

Egg Blowing 101: A Tutorial

Have you ever wanted to decorate eggs that you could keep forever?  You can empty and clean the eggs quickly and easily so you won’t have to use your creations for egg salad!

I use an egg blowing tool (available here), but you can also use a tack or small drill bit and a syringe (without the needle).  Along with the supplies I have pictured below, I also use a large bowl for collecting the egg whites/yolks and another large bowl for cleaning (if you are emptying a lot of eggs you could also use your sink).

Egg Blowing Supplies

Step 1:  Using your drill tool notch one end of the egg and drill a hole.  (If you are using a syringe you will need to make a hole on each end of the egg.)

Drilling Egg

Step 2: Take the cap off of the pump and insert it into the hole (which is facing down).  Put your thumb over the hole and squeeze.  As you squeeze the pump you will begin to empty the egg.  When you squeeze all the air from the pump into the egg, take your thumb off of the hole and pump again.  (If you are using the syringe to empty the egg place the tip in the top hole and squeeze so that the egg contents come out of the bottom hole.)

Use caution during this step because if your egg is cracked at all or too thin it will break as you pump air into it.  Also, if you pump too much air into the egg too quickly it may break.  I usually poke the end of the pump tool into the egg now and then to help some of the material come out and also to pierce the yolk sac.  This step will take a couple to a few minutes, depending on how big your egg is.

Emptying Egg

Step 3: Once your egg is empty it’s time to wash it.  Using warm, soapy water wash off the outside of the egg.  Submerge the pump tool into the water to fill it.  Insert it into egg and squeeze the water into the egg.  Repeat this until only clean water comes out of the egg.  Rinse the egg in clean water and shake out excess water.

When your egg is clean you can microwave it to sanitize it, if you’d like.  I place my eggs on a paper towel-lined plate and microwave on high 3 times for 10 seconds each.

Washing Eggs

Step 4:  I cook all of the egg whites and yolks and give them to our chickens, turkeys and ducks.  The cooked eggs are a very nutritious treat for the birds!

Scrambled Eggs

Step 5: Once the eggs are dry they are ready to be decorated.  Be creative and have fun!

Trying a New Waterer

Last year we added ducks to our chicken coop.  It worked quite well, except for the mess they made of the waterer.  For a long time we had the waterer in the chicken house raised so only the chickens could get to it, and a general water trough outside.  This worked for a while, but eventually became a mess in its own way.  If only we had an automatic water system…

Then one day we got our FarmTek catalog in the mail.  Looking through it, I saw that they had a plan for making a poultry drinker with a 5-gallon bucket and their Super Flow push-in Nipples.   Basically you get a 5-gallon and drill 3 holes in the bottom.  push the drinker nipples in, fill with water and hang it so the bottom is about eye-level for your poultry.  We keep the lid on the bucket so that the water stays clean, but we only snap it on in 1 or 2 places so it’s easy to take off.

We ordered 6 nipples but just make one waterer to begin.  We showed the poultry how to drink from it by holding their beaks to it and they will drink from it, but still prefer the outdoor water bowl.  I think if we switched over to only this type of waterer, they would use it without problem.

We made a 2nd drinker when our ducklings were old enough to house with the rest of the chicks.  The young chicks, ducklings and poults adapted more quickly to the new system than the older birds did. 

Here are photos of the drinker in the chick nursery:

Chicks and ducklings drinking from hanging waterer

Another picture showing the handle

They are still using this waterer exclusively, however, when the rain fills their little pond up they prefer to drink out if that.  Even though they have been trained to use this bucket drinker, drinking out of a trough (or puddles) is more natural to them.

Surprise!!

Saturday was very busy here…lots of mowing, weeding and moving sheep.  We bought a New Holland tractor a couple weeks ago for mowing the fields since the lawn tractor that we had been using caught on fire while I was mowing.  (Moral of that story – everyone should have at least 1 fire extinguisher and know how to use it!)

Anyway, Dave went up to the top field (the riding arena) to let the goats and Karloff out so he could mow it.  The next thing I knew he was back by the barn yelling “Kim, you have to see this.”  That usually doesn’t refer to something good.  Along with Karloff and the goats in the field were our 3-month old chicks in their chicken tractor, but when I got to the gate I saw chickens running all around and 2 really big chickens in the tractor.

The goats and Karloff like to rub on the chicken tractor and the wire on one side had given way.  Of course the goats couldn’t resist a buffet of chicken feed.  Karloff was the only good one and was sleeping in the sheep/goat shelter (it’s on the left in the background).

We lifted up the back of the chicken tractor to let Rudy and Buster out, fixed the wire and caught all the chickens.  Then Dave could finally mow the field!