Felting Soap – A Tutorial

Felted soaps are easy and fun to make, plus they can be wonderful gifts!  The felted wool (or other fiber) acts to exfoliate and gently scrub your skin as you wash.  As the soap gets smaller the fiber will continue to felt and also shrink.

I’ve detailed the steps for wrapping the fiber around the soap below.  I’ve also included a video at the bottom showing how to felt the fiber onto the soap.

Below are the supplies you will need to make your felted soap: wool (or other fiber suitable for felting), soap, knee-high nylons.

Felting Supplies

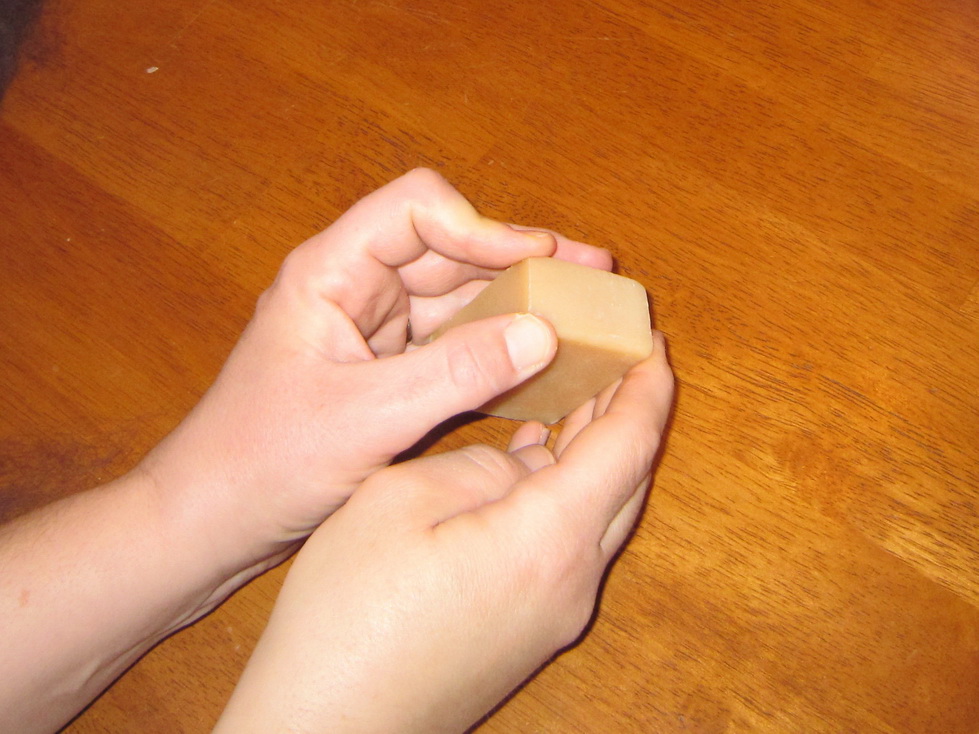
Step 1 – Gently press the edges of the soap so they are rounded (if necessary).

Rounding Edges

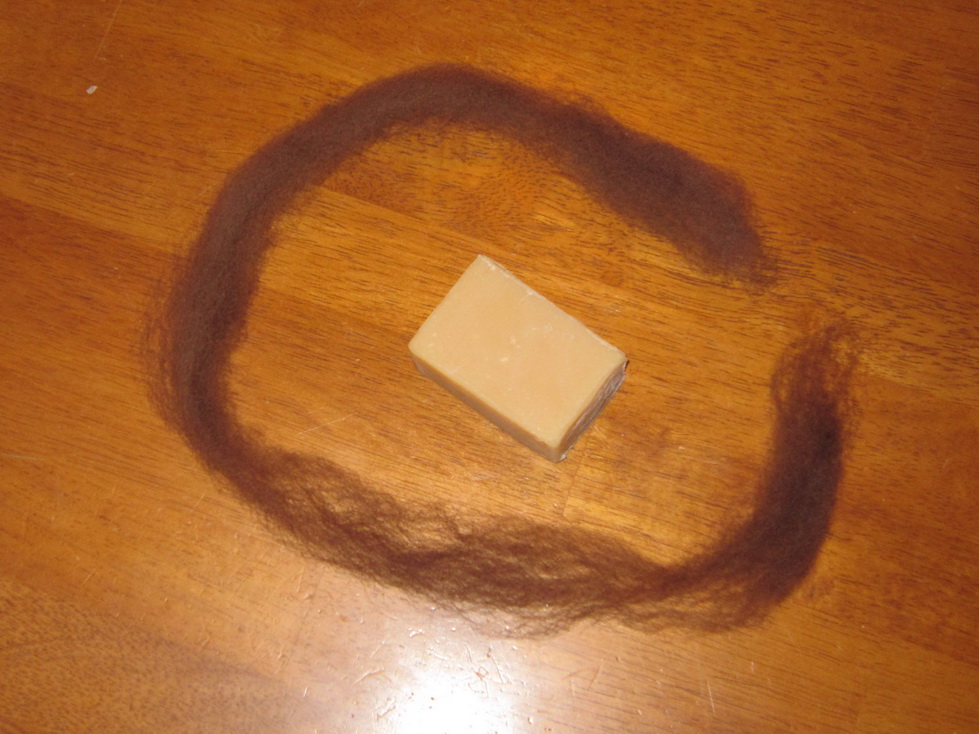
Step 2 – Draft out some fiber so you can wrap it around the thin edges of the soap.

Drafting fiber

Step 3 – Wrap fiber around thin edges of soap.

Fiber Wrapped Around This Edges

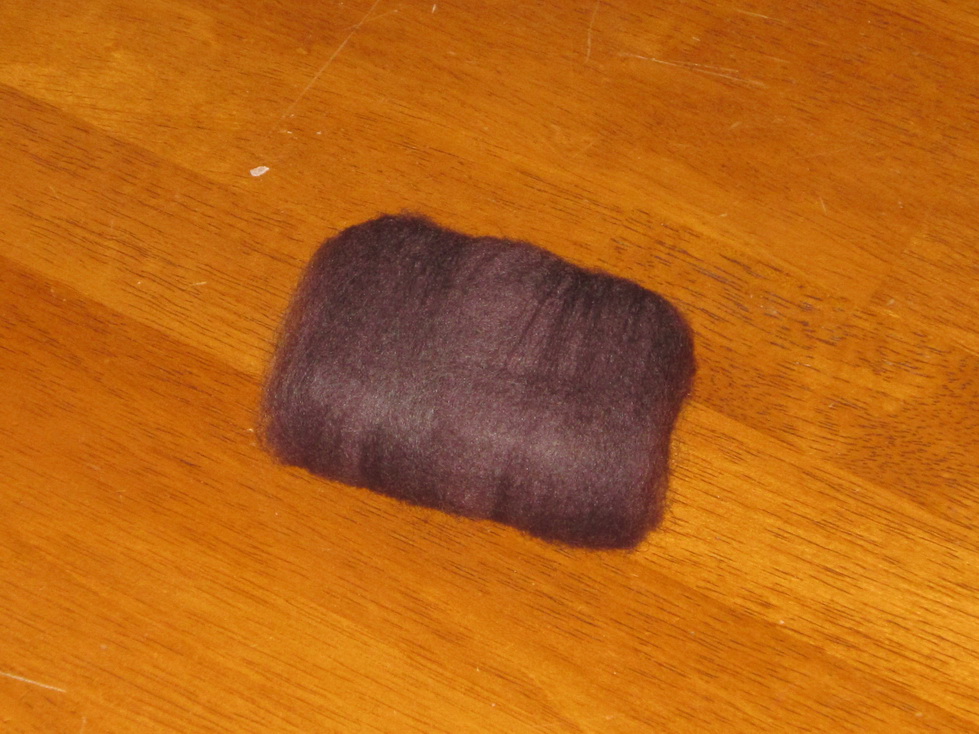
Step 4 – Prepare fiber to wrap around the wide sides of the soap by drafting it to be wide but sheer.  Felting is easier when you work with several thin layers of fiber instead of a couple thick layers.

Fiber for Wide Sides

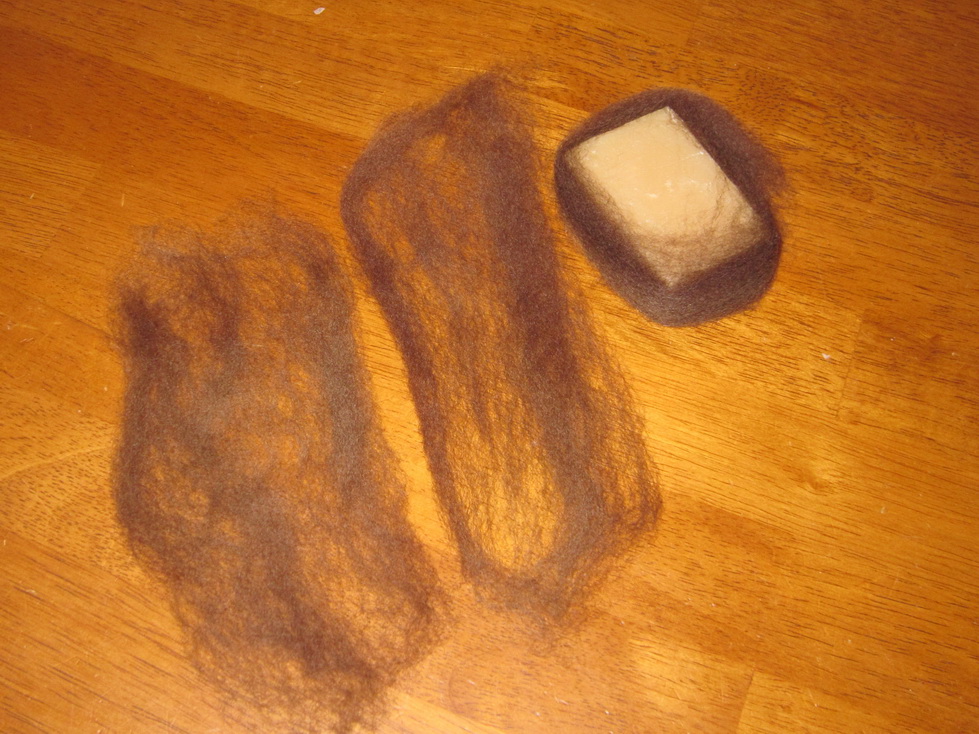
Step 5 – Wrap soap with fiber, alternating directions so that the fibers criss-cross.

Wrap 1 way

And the Other

Continue until you cannot see the soap through the fiber.

Ready for Decorations

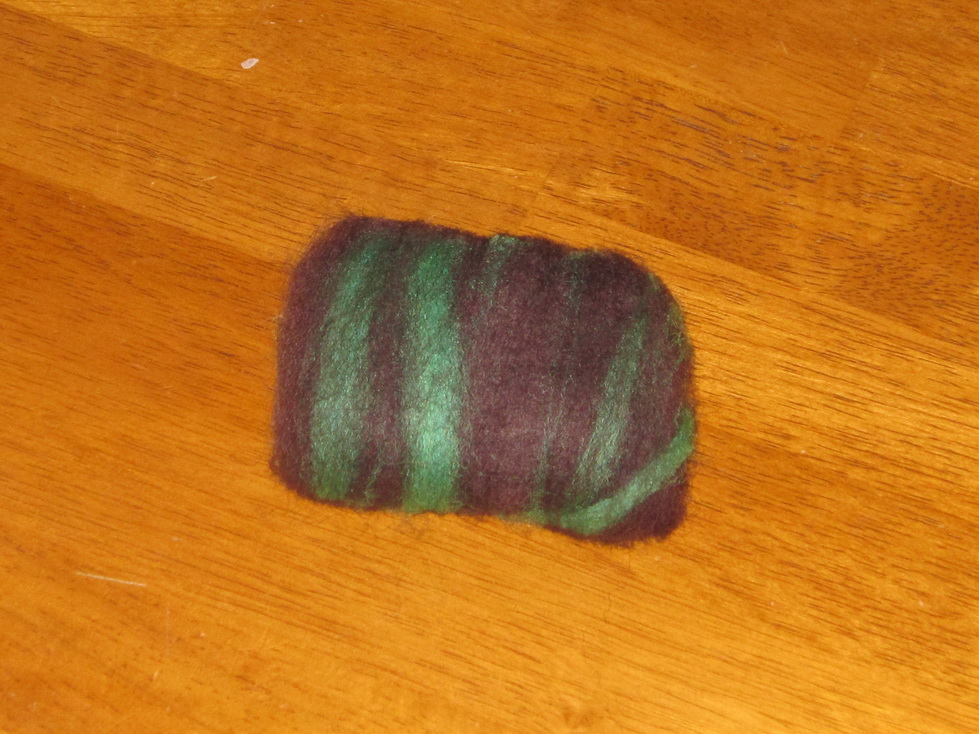
Step 6 – Decorate with other color(s) or create a pattern/image if desired.

Ready to Felt

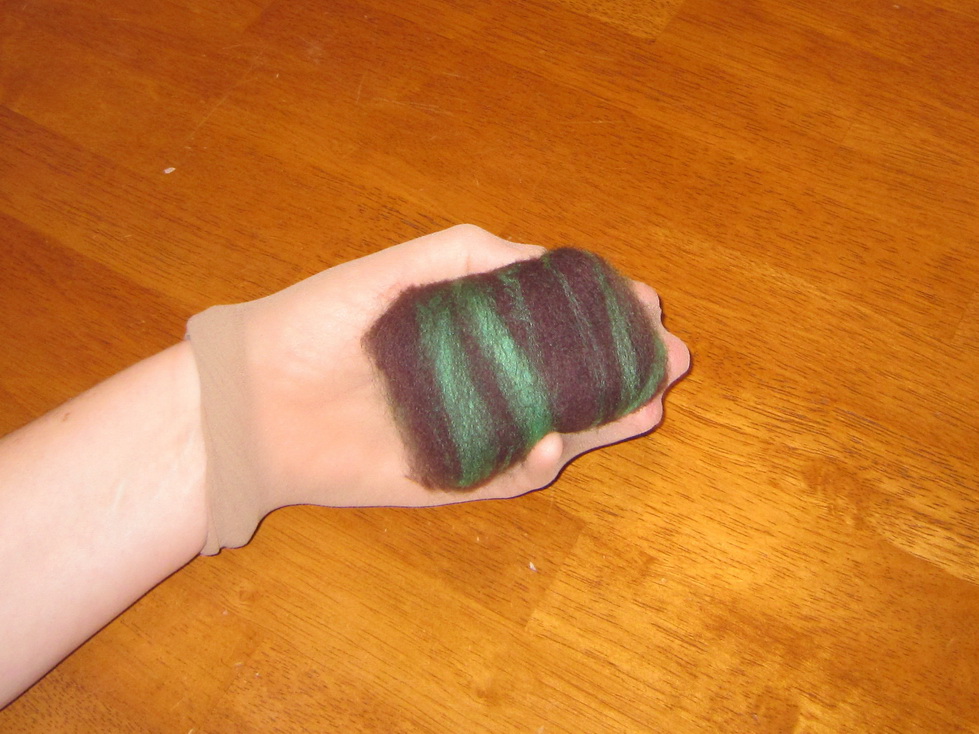
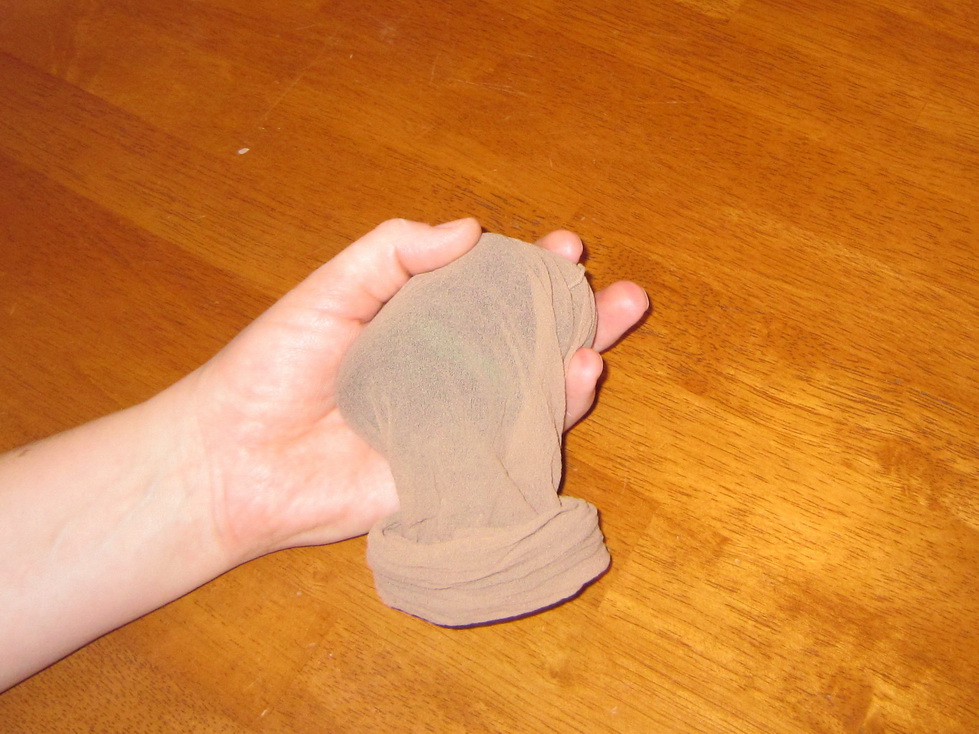
Step 7 – Put nylon knee-high over your hand.  Place fiber-covered soap in your nylon hand and turn the nylon inside-out over the soap.

Wrapping Nylon around Soap

Soap Wrapped in Nylon

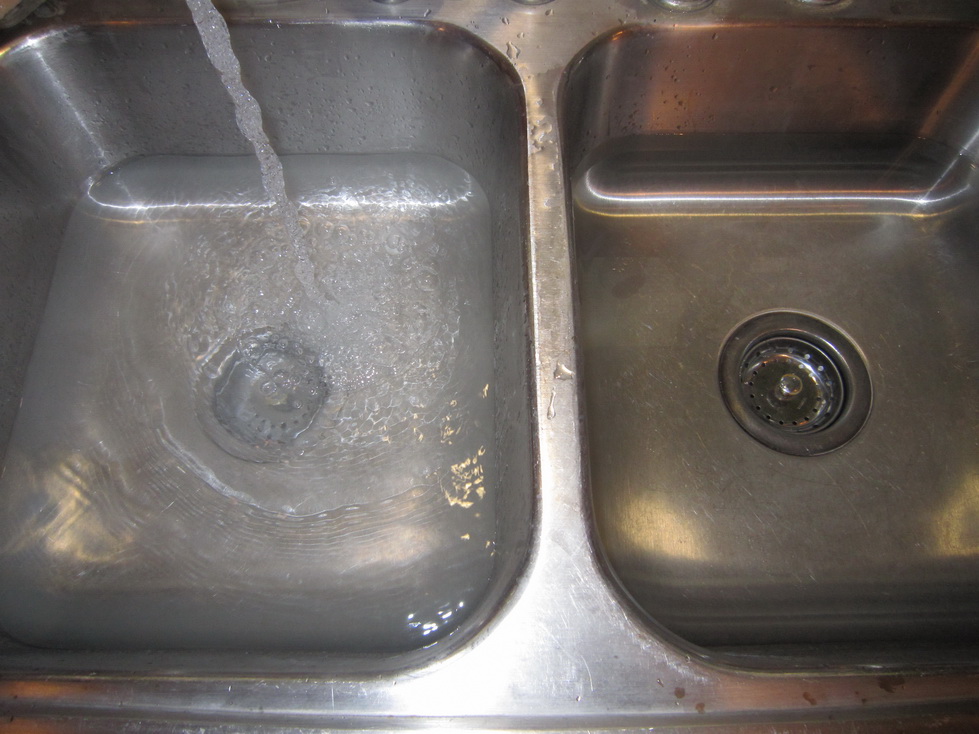
Step 8 – Fill sinks (or containers) with hot AND cold water.  If you are felting scented soap and are using containers, use glass or metal because plastic one may absorb the soap’s fragrance.

Hot and Cold Water for Fetlting

Now your soap is wrapped in fiber ready to be felted.  Please watch the video below for the felting instruction.


Your soap will take a day or 2 to dry… then enjoy!

Oops… or, Another Lesson Learned

We have bred our sheep and had successful lambing seasons for 6 years. This fall breeding season, however, turned out to be a learning experience for us.

Usually at 3 months our lambs are separated from their dams for weaning. After 2-3 weeks we move the ewe lambs back to the pasture with the adult ewes. The ram lambs go in the pasture with our adult rams and wethers. For some reason (I can’t remember why right now), we let ALL the lambs go back to the pasture with their dams for the summer.

On October 13th, we took all the ram lambs away from the ewes because we saw some *frisky* behavior going on.  We had decided to put our rams in with the ewes in early November so that we wouldn’t have lambs until April.  We separated our rams so that Ezra and Camille we together in one field (Camille is our only ewe that Ezra is not related to), and Raulie was with Annie, Abigail, Bertha, Beatrice, Erin and Esme.  We put all the lambs in a 3rd field with our wether BFL and goat.

{Some background info on sheep breeding… We put breeding harnesses that hold crayons on our rams each breeding season.  When the ram mounts the ewe the crayon on the harness rubs on her rump.  We then have  visual evidence of breeding and can mark our calendar accordingly so we can calculate when any lambs will be born.  Sheep cycle ever 14-18 days, therefore, you should change the color crayon in your ram’s breeding harness every 14-15 days.  If a ewe is marked with the second color, this means she did not conceive during the 1st cycle.  Any ewe that did conceive in the 1st cycle will not cycle again and the ram will not have any interest in mounting her.}

After 2 weeks of rams and ewes together, not one of the ewes was marked with color on their rump.  We usually breed in October, I started to wonder if we missed our window of opportunity, but I didn’t really think that was the case because we have had rams breed ewes though December.  Since none of the girls were marked, I didn’t bother changing crayon colors for their next cycle.  Two more weeks with nothing, and during that time I started thinking that we left the ram lambs in with their dams too long because the adult rams were not mounting the ewes at all.  You’ll remember that we did see some frisky behavior earlier in the fall, but we didn’t witness any actual breeding.

Now that we’re in the New Year, we are anticipating a surprising lambing season because we think our ewes are pregnant, but we don’t have any idea when they are due.  We guess that any lambs will be born BEFORE mid-March since we took the ram lambs away from the ewes in mid-October.  Unfortunately this lamb crop will not be able to be registered, but we will look forward to the lambs anyway!!

Making Gnocchi

Gnocchi can be made 2 ways… with potato or Ricotta cheese.  I use my grandmother’s recipe to make mine and use Ricotta.

What you’ll need:

3 lbs         Ricotta Cheese

2lbs+        Flour (you’ll need to add more than 2 lbs so that the dough isn’t sticky and also for rolling the dough)

3                eggs

handfull of parmesan (I use Locatelli instead)

Gnocchi boards or forks

gnocchi1

Step 1 – Put wax paper on cookie sheets.

gnocchi2

Step 2 – Measure out ingredients and make “well” in center of flour.

gnocchi4

gnocchi3

Step 3 – Mix together eggs, Ricotta and parmesan.

gnocchi5

Step 4 – add wet mixture to well in flour and knead dough (don’t over-knead or the dough will become tough).

gnocchi6

gnocchi7

Step 5 – Wet a towel with water, wring it out and cover dough so it doesn’t dry out.  Cut of small amount of dough off.

gnocchi8Step 6 – Roll into long “rope” and cut into small pieces.

gnocchi9

gnocchi10

Step 7 – Roll pieces of dough on gnocchi boards or forks.

Step 8 – Freeze gnocchis on cookie sheets then put into freezer bags (you can also cook the fresh gnocchis).

Step 9 – Cook in boiling water until they all float.  Serve in a dish with gravy (we don’t call it sauce!) and enjoy!

IMG_7263

Seasonal Ram Changes

Autumn is here and that means we will be breeding our sheep soon.  I really find it amazing how rams change during the late summer and early fall in preparation for breeding.

Above are 2 photos of our newest ram, Raulie.  The photo on the left was taken when we got him in April and the one on the right is from yesterday (September 30th).  You can immediately see differences in his facial features – his face is more wrinkled and swollen now.

As soon as you come close to (most) breeding rams, you will notice a major change in them … their scent.  Most rams smell musky during breeding season (or rut) – and some smell more than others.  Sheep have scent glands between their toes and next to their eyes.  You can see in the above photo how the scent glands next to Raulie’s eyes have increased in size to produce the musky odor that comes with the breeding season.

The ram’s olfactory sense is heightened during rut so that he can more easily detect when a ewe is in estrus (heat).  To accommodate this, the nasal passages swell so that the surface area is increased.  Sheep also have a specialized organ above the roof of their mouth called the vomeronasal organ that aides in their sense of smell.  When the ram smells the ewe, he breathes into his nose and mouth.  Her scent is picked up by his olfactory cells and the vomeronasal organ and he raises his head and curls his upper lip (this is called the Flehmen response).

Isn’t it amazing how these animals were created so that their bodies change with the seasons?!

Remembering September 11th, 2001

Eleven years ago thousands of Americans lost their lives in a horrific act of terrorism.

September 11th, 2001 was my 2nd day at my new job at the US Court of Appeals Law Library in Philadelphia.  We first heard the news from a friend of my co-worker who worked in NY.  He didn’t say what kind of plane crashed so I immediately called my boyfriend (now – husband) because his company (an aerial survey company that I had just left to join the library) flew in NYC airspace frequently.  I couldn’t imagine a large jet would crash and could only think that it might be one of the flight crews that I had worked with.

Then we found out what happened.

Center City Philadelphia was essentially evacuated.

As soon as I left the courthouse I called my dad…and looked up.  Rumors were traveling that Philadelphia was on the terrorists’ list of targets.  One memory that’s burned into my mind of that day is the brilliant blue sky.  It was gorgeous.

Mass transit was a nightmare.  It took me 2 hours on the regional rails to get to NE Philadelphia (a ride that usually took 30 minutes or so).  But I couldn’t even get to the station near where my car was parked.  That line was closed because it was also an Amtrak line that went into NYC.  Someone on the train offered another girl and me a ride to that station since we were both parked there.

I got to the station and went around the block to my boyfriend’s condo.  I walked in the door just when the second tower collapsed.  I sank to the floor and cried.

The news was on the rest of the day following any details that emerged.  The courthouse was closed the next day and when we returned to work on Thursday federal police armed with automatic rifles were guarding the courthouse (and every other federal building in the country).


My son, Noah, came home from school today and said, “Mom, do you know what happened on 9/11?”

Me: yes, did you learn about it at school?

N: yeah … {he then told me about the big planes that had lots of people on them and they crashed into two tall towers in NY}

Me: {almost in tears} did you learn about another building in Washington DC called the Pentagon?

N: no

… I then told him {with tears rolling down my face} about the 3rd plane that crashed into the Pentagon.  And I told him about the 4th plane where the passengers learned about what happened in NY and DC and how they became heroes because they didn’t let the “bad guys” who were flying the plane crash it into another building.  That plane crashed into a field in PA and those passengers died too, but they saved many other peoples’ lives.


Noah has learned about September 11th before, but I think this year (2nd grade) he could grasp what happened that day.

I pray that we never forget that day and continue to teach our children what happened.

Mom-Mom’s Meatballs – a Cooking Lesson

My mom-mom was a little Italian woman who could make anything.  Crafts, cooking, baking … you name it, she could do it.  Every Sunday our family would gather at Mom-Mom’s and Pop-Pop’s house for dinner.  Almost always a homemade Italian meal.  The only exceptions were the dog days of summer when Pop-Pop would grill.

All of us grandkids helped make spaghetti, ravioli, gnocchi, manigot (manicotti), lasagna … and meatballs.  I’ve promised a lesson on making gnocchi, but today we’re talking meatballs.  Mom-Mom’s meatballs were famous.  She’d never make less than 50 at a time, and more often would make 100-200.  She’d sell meatball sandwiches each year at the church’s June bazaar, along with fresh-squeezed lemonade, and people would flock to her booth.

Mom-Mom never measured ingredients and didn’t have a recipe for her meatballs so trying to replicate them was not always easy.  She had it all in her head, but we kept asking for a written recipe.  Thanks to our dear friend, Melba, we got one.  One day when Mom-Mom was making her meatballs Melba was visiting.  She took a pen and paper and wrote down everything Mom-Mom put in the mix.  Every time I make meatballs, I think of my mom-mom.  I also think of Melba and how grateful I am for the recipe in my hands, because it’s more than measurements – it’s a connection to wonderful memories.

 Now to the recipe and the lesson!

What you’ll need:

5 lb                    ground beef (I use 80% lean)

2-1/2 cups          breadcrumbs (or 1/2 cup per lb of meat)

5                       eggs (or 1 egg per lb of meat)

garlic powder, parsley, basil, grated locatelli cheese, salt, pepper, italian seasonings to taste.

Step 1

Spay a baking pan with olive oil Pam or rub with olive oil.  Turn oven on to 350 degrees.

Step 2

Mix ingredients in a large bowl by hand.  (I suggest that you remove any rings)  Instead of salt and pepper I like to use Nature’s Seasons (bottle with blue cap).  Be gentle while you mix the meat or your meatballs will be very dense.

I forgot to put the bread crumbs in the photo above!

Step 3

Roll the meat into meatballs.  Try to keep them somewhat uniform in size so they cook at the same rate.  Also, don’t pack them while you’re shaping – they’ll end up too dense.

Step 4

Bake in your preheated oven for 30-45 minutes, or until browned.

Step 5

Now they’re ready to eat, add right to your spaghetti gravy (no, we don’t call it sauce in our home), or cool and freeze.  Any juices in the pan can also be added to the gravy or frozen for future use.  Don’t throw them away … I believe Marie on the TV show Everybody Love Raymond called those juices liquid gold!

I hope you enjoy making and eating these meatballs as much as I do!

Fall is Almost Here…

…and the garden is winding down. 

This summer, in southeastern PA, has been a weather rollercoaster.  A pleasant but dry June was followed by a HOT and even drier July.  August brought some cooler temperatures and rain.  Lots of rain.  And flooding – especially with the arrival of Hurricane Irene and the remnants of Tropical Depression Lee.  Philadelphia recorded its wettest month EVER in August!  My garden is looking a little unkept now – to say the least – since I haven’t been tending it in the rain.

I had several firsts this year in my veggie garden!  I harvested my 1st asparagus from the bed I started last year.  I tried growing tomatoes from seed planted directly into the ground.  I didn’t spray any insecticide (I only use 100% natural sprays when I need to use them).  I also saw my 1st lacewing in my garden!

Last year I planted 10 asparagus crowns and only 2 didn’t make it.  The other 8 began sending up spears in April and I was able to harvest a few during a 2-3 week window.  New research has shown that you don’t have to wait till the 3rd year before harvesting, and harvesting the 1st year after planting actually increases the buds that are formed by the crown.  For more information on growing asparagus, click here.

For the 2nd year in a row my seedlings didn’t grow more than 2 inches.  Although I haven’t figured out the cause yet, I tried planting my tomato seeds outside at our last frost date (for our zone 6 garden, it’s May 15th).  I heard someone say that they regularly do this and harvest tomatoes the same time as their neighbor who uses started plants.  I must say I was a little skeptical, but my seeds sprouted and grew.  I trellised and pruned them, and they began to produce fruit.  I ended up harvesting tomatoes the same week my father-in-law, who used started plants, did!

This summer I didn’t spray my garden at all with pesticide.  I usually use an all-natural product called Pyola from a company called Garden’s Alive.  It’s a concentrate made of pyrethrins and canola oil that you dilute with water and apply as needed. I did use diatomaceous earth on my eggplant to try to control the flea beetles that were attacking it, but after seeing my 1st lacewing in my garden I decided to try to do without spraying the entire garden.  In addition to the lacewing, my Garden Patrol also included Wheel Bugs,

adult wheel bug eating a bumblebee


hatchling wheel bugs and eggs


wheel bug nymphs

Praying Mantises,

praying mantis on a tomato plant

various spiders, native and Asian Ladybugs,

pink spotted ladybug


checkerboard ladybug

frogs, American Toads,

American toad

various songbirds and Milk Snakes .

juvenile milk snake

I truly enjoyed all of the life in the garden this year and always wondered what I’d see each time I worked in it.  I have big plans for next year and I’m anxious to start on them.  We’re going to finish putting mulch down in between the beds to eliminate the need to mow the garden.  I’m also adding a perennial herb bed with rocky areas for snakes and toads to hide.  The birdbath will move to the center of this bed.  Lastly, we’re going to plant 2 organically grown blueberry bushes next spring.

Stay tuned for updates along the way!

Lavender and Cuckoo Clocks

You may be asking yourselves what could lavender and cuckoo clocks possibly have in common….  I’ll tell you:  Mrs. Parr.

When I was a little girl, my mom-mom would babysit my sister and I while our mom and dad worked.  She and my pop-pop only lived about 5 blocks from us in our small town in south Jersey.  Mrs. Parr lived 2 doors from my grandparents and I loved to visit her and her husband.   

When I think of her house I remember the smallish but beautiful cuckoo clock in the plain living room.  I loved to listen to it announce the hour!  The detailed carving was so lovely and the polished wood shone. 

Out back you were immediately met by gardens with a myriad of flowers as tall as I was (remember, I was 5 or 6 at the time).  There were daisies and other wildflowers everywhere.  I first learned about lavender there.  I remember Mrs. Parr showing me the flowers and giving me some to dry.  I had those dried lavender buds in a dish on my dresser for years… and thought of her each time I looked at them.

Now lavender is an essential part of my garden.  My 1st garden in Philadelphia had lavender and it came to the farm when we moved.  I’ve learned about its medicinal properties (see my previous post) and how to propagate it.  I’m now planning to plant a lavender hedge along our patio in the coming seasons.

Oh, and as for the cuckoo clock… I’m still waiting for one.  Dave has been to Austria and Germany for business over the past couple years.  I’ve requested one the next time he goes back!

More Babies on the Farm – Updated!


 Last night, after 7 days incubation,  the caterpillar eggs on our front door began to hatch and this morning I got photos of the tiny hatchlings.  You can see the tiny, 1st instar yellow Wooly Bear caterpillars below:

Newly hatched caterpillars

Update!

Later, yesterday afternoon I took the following photo:

More eggs have hatched!

 You can see that more of the caterpillars have hatched and they are eating the egg remains.  More eggs have hatched! 

Wooly Bear caterpillars eat grasses, clovers and leaves from various shrubs and trees so I carefully transferred the tiny larvae to the grass this morning.  Spilosoma virginica (Virginia Tiger Moth) has 3-4 life cycles per year and mature caterpillars are usually active from May to November.  These caterpillars will probably grow larger and hibernate as caterpillars, creating an antifreeze-like substance in their bodies to protect their cells from freezing. 


New Life

Every year we experience the wonderful miracle of life here on our farm many times over.  Sometimes it happens right under our noses without us knowing.  Tonight I found a female Tiger Moth laying her eggs on our front door.

Female Tiger Moth

Amazing to watch!

Laying another egg!